Service
terms and conditions
We
assure that the meat mincer can work well with one year quality guarantee.
The
product is protected against defects in materials and workmanship for one
year from the date of original purchase.If the product proves to be defective
in materials or workmanship during this period,it will be repaired free of
charges.
This
service does not apply to damage resulting from misuse,accidents or alterations
to the product,or to damages incurred in transit,also does not apply to cords
or plugs.
All returns must be carefully packed and made transportation prepaid with a description of the claimed defect.
Gingerking MEAT
MINCER
Instruction and Recipe Booklet
Congrtulations
on acquiring your new hand operated meat mincer.
Meat
mincer is ideal for every kitchen. It can be used for mincing meat,pepper,,foodstuff
etc.
Its
unique design and durability renders high yield output.
Easily
assemble and use and easily dismantled for cleaning .
the
meat mincer meet food hygiene requirements.
Using
procedure:
CLEAN
AND MAINTANCE
After each use unit should be thoroughly washed in hot,soapy water and dried
thoroughly utilizing terrycloth toweling.A light coating of vegetable oil
should be applied fo preservation of metalic finish.Use hot water to clean
the mincer parts and wipe dry, assemble the parts together according to diagram
instruction and then affix it on a board.
Adjust
the screw ring,place the knife and plate parallel in a grinding position and
ensure that The handle can be operated easily.
Clean
the meat,remove the skin and bones and cut it into strips ,put the meat strips
into the feeder And then turn the handle for mincing.
Maintenance:
Wash
the mincer every time after use and wipe dry ,coat it with a few drops of
edible oil to prevent rusting.
Note
for use and warning
1. mincer
meat only without bones and skin.
2. when
mincing meat,knife inside and plate outside.
3. after
use,wash it and apply some edible oil smeared on the face of the blade to
prevent rusting.
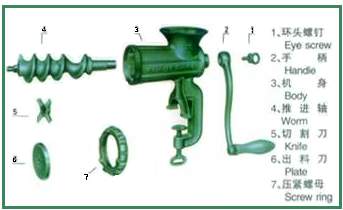
Insert
worm 4 to body 3,fix handle 2 in the worm 4 attachment ,then eye screw 1.
Mount
knife 5 in the worm pin then plate 6,tighten the screw ring finally.
Do not put your figers or other objects into the chopper opening while it
is in operation.
Húsdaráló
Előírások
és Recept Füzet
Gratulálunk, az Ön új kézzel működtethető húsdarálójához.
A húsdaráló minden konyhához ideális választás. Használható hús, paprika és egyéb ételek darálására.
Egyedi formája és tartóssága magas kihozatalt biztosít. Egyszerű összerakni és használni, és könnyen szétszedhető, ha tisztításra kerül sor. A húsdaráló megfelel az ételhigiénia előírásoknak.
Használati útmutató
A húsdaráló tisztításához használjon forró vizet, majd törölje szárazra az eszközt. Szerelje össze az alkatrészeket a mellékelt ábra szerint, majd rögzítse a terméket szilárd felülethez.
Illessze be a csavar gyűrűt, helyezze be a kést és a lapot a darálást elősegítő pozícióba, és győződjön meg róla, hogy tekerő könnyedén működtethető-e.
Tisztítsa meg a húst, távolítsa el a bőrt és a csontot, majd vágja csíkokra. Tegye be a húscsíkokat a daráló szájába és tekerje a tekerőt, hogy darálhasson.
Karbantartás
Minden használat után mossa el a húsdarálót, és törölje szárazra. Tegyen egy pár csepp étkezési olajt a darálóba, hogy elkerülje a rozsdásodást.
Használati megjegyzések és figyelmeztetések:
- Csak bőr és csontok nélkül daráljon húst.
- Ha húst darál, a kés belül, a lap pedig kívül legyen.
- Használat után mossa el a darálót és tegyen egy kis étkezési olajt a késre, hogy elkerülje a rozsdásodást.
Helyezze be a csavarmenetet (4) a testbe (3), rögzítse a tekerőt (2) a csavarmenethez (4), majd csavarja össze a (1) csavarral. Rögzítse a kést (5) aztán a tálcát (6) a csavarmenet végéhez, majd tegye rá a csavar gyűrűt a végén.
| |Ginger | |Tools | |Contact |